The common belief is that creating in WordPress is not easy. However, it is! And we’re going to explain how to do it in this article. At the same time, many newbies tend to spend a lot of time creating in WordPress. Therefore, if you want to make a custom post in WordPress, it will require slightly more efforts and time. If you place content in WordPress, it’s automatically displayed as a blog post.
Using tips from this article, you will learn how to create using WordPress tool.
Blog Page
As users having different experiences of working in WordPress may read this article, we’re going to start from basics. Those who’ve experienced working in WordPress can switch to next section.
You can organize all your content of your blog as it is used as your home by default in WordPress. It appears when you type URL of the main website in Chrome or other browsers you use.
How to Change Default Settings
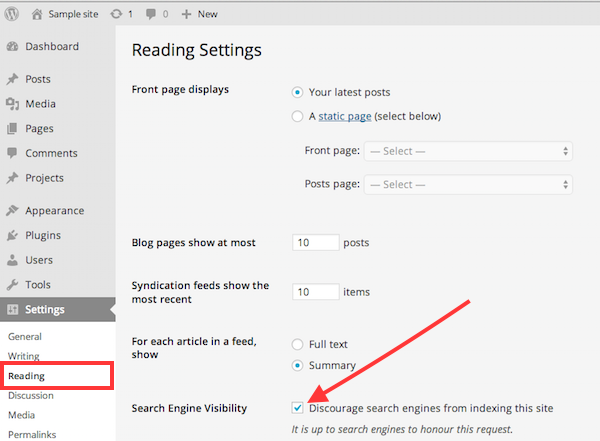
Have a look at your admin dashboard in WordPress. You will see “Settings” on the left side of your screen. The blog you’re creating will appear in “Reading Settings”. At the top of “Reading Settings,” you will see the option “Front Page Displays” which is set to “Your Latest Posts” by default. In order to change this setting, you need to change this option to “Static Page”. This setting determines whether a blog you create will appear on the homescreen. The next step is to design two posts.
How to Make a Custom Page
The option of creating a custom one is in-built in WordPress. You can make a separate page. To reach this goal, you will need to design two posts: first one will be your custom place and second one is your blog post.
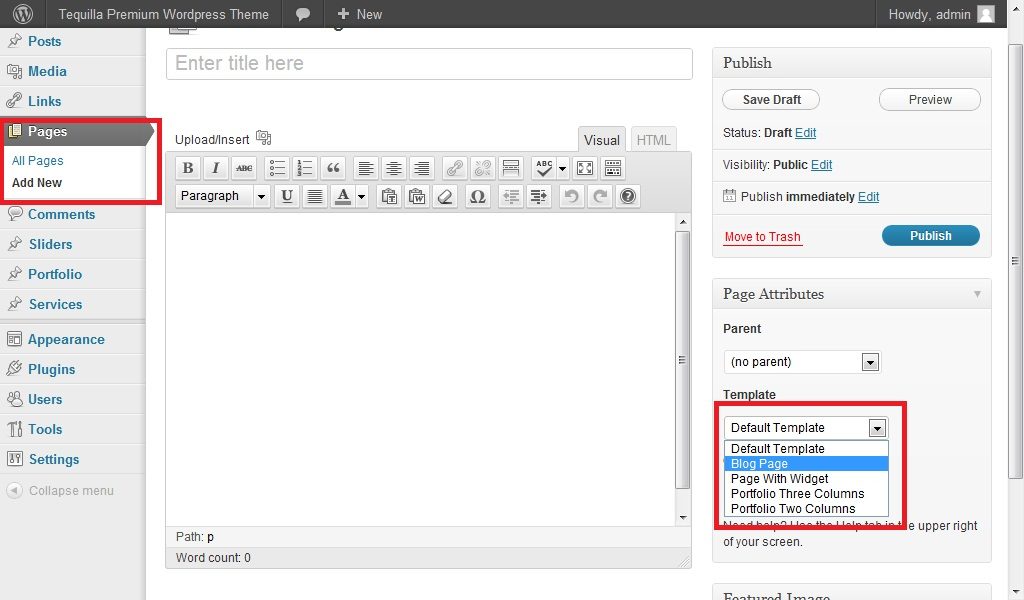
Just log in to your WordPress admin account, go to the menu and choose “Pages” on the upper left corner and then choose option “Add New.” Title it as “home.” You will see Attributes box on the down right side of the screen to be able to choose template.
There are the most popular themes in WordPress you can use. You can use one that meets the requirements of your website. Try to experiment with themes to find the most appropriate one to reach your goals. For example, you can use these templates to make one separate post on any popular topic even of mice and men essay for your trusted writer’s service or blog posts for the purposes of other businesses.
As a rule, one Full Width Template is included in many themes when creating “Home.” The Front Page Template is one of the most popular and widely used themes used to design separately.
When you choose the theme, click on “Screen Options” on the upper right corner to check one Discussion box. It will display the edit area. You need to deactivate buttons of comments and trackbacks aiming to disable discussion. If you need to publish without any additional revisions, you should press the button “Publish” and it will become available on your website.
How to Create a Blog Post Page
The second step is to create a post. We suggest that you title it as “Blog”. Basically, the process of creating a post is the same that the one with a custom place. Even if this is your first experience with WordPress, you can handle it. What you need is just to follow the steps you’ve done when you created your custom place.
As a rule, WordPress themes are equipped with various templates. It’s better to choose one template for “Blog.” One template “Blog” is available in many themes. If there are no templates in the chosen theme, you may use template available by default. For example, if you use Twenty Fourteen theme, available templates are Default Template, Contributor Page and Full Width Page. By analogy with the custom page, you can use Default Template that is available in Twenty Fourteen theme. As well as in case with the custom place, it’s important to disable options of comments and trackbacks as well.
Final Revision and Publishing
Hence, we created separate page and blog post. Further, we need to find “Settings-Reading” option: choose A under the “Front Page” option. Below you can choose the pages that will be used as a front and the post ones.

Save the changes you’ve made and press the “Preview” button to check how your post will look like. Make changes if necessary and save again. If you need to display blog page in navigation menu, find “Appearance-Menus” to add it to the menu. Now your post is ready for publishing. You can either publish it or send for preview to your manager for agreement.
Now you can see that creating a separate page is very easy even if you don’t have any experience. You just need to log in to your account and create in several simple steps. It may take more time the more experiences users spend, but the time will shorten when you gain experience. We really hope that we presented enough information and explanations to make your task easier. In case if you still have any questions, you may leave comments so we can address your concerns. You may also wish to look at the related articles. Good luck in creating!